Pages

Showing posts with label MVC. Show all posts

Friday, August 8, 2014

HowTo:: Scala Spring 4 MVC without Web.XML configuration with static resources handling

This blog post is fully focused on Scala language and how to use it for Spring 4 based application development. I'll  modify application I've used over previous blog post series ("Spring4Netty without Web.XML configuration on Java 8.."). 

  Although Spring Framework is so popular in the Java land, there is no reason why not to use Scala language for the EE application development. 
In case when the Applicaiton front-end uses popular AngularJS Framework I personally find Scala usage much "easier" (ps: still lot of work :) and comfortable to understand back-end and front-end functionality as javascript uses callbacks. 

for building new Spring4 Scala application we use following tools: 
of course Jetty server can be change to the Tomcat one. 
  Whole sample application has been developed in IntelliJ IDEA 13.x IDE. 
After we have created the SBT project under IntelliJ we need to import some plugins.
Img.1.:: SBT Project Structure - plugins.sbt
  To import them we change sbt plugins setup by modifying appropriate file (Img.1.) in the following manner. 
addSbtPlugin("com.earldouglas" % "xsbt-web-plugin" % "1.0.0-M4")

addSbtPlugin("com.github.mpeltonen" % "sbt-idea" % "1.6.0")
  We have now added two plugins  xsbt-web-plugin and sbt-idea.  The xsbt-web-plugin is used for building web enterprise application. Both of them are extensions to SBT building tool.

  Next step is to add necessary libraries dependences into the build.sbt file. As we want to link also static resources, for the front-end development, the number of needed libraries will be bigger. 
  The build.sbt file will look after our modification like following example.
name := "miko-spring-scala"

version := "1.0"

scalaVersion := "2.10.3"

libraryDependencies ++= Seq(
  "org.springframework" % "spring-webmvc" % "4.0.6.RELEASE",
  "org.springframework" % "spring-context" % "4.0.6.RELEASE",
  "org.springframework" % "spring-context-support" % "4.0.6.RELEASE",
  "javax.servlet" % "javax.servlet-api" % "3.0.1" % "provided",
  "javax.servlet" % "jstl" % "1.2" % "compile",
  "org.eclipse.jetty" % "jetty-webapp" % "9.1.0.v20131115" % "container, compile",
  "org.eclipse.jetty" % "jetty-jsp" % "9.1.0.v20131115" % "container"
)

jetty(port = 9090)
here is visible which kind of servlet engine provider will be used (in case of Tomcat change jetty() to tomcat()). 

  When the SBT application is ready we will use commands to start/stop it.
... SBT console ...
container:start

container:stop
...
  All libraries and plugins are ready and we can start building Spring4 Scala Application without using Web.XML and with linked static resources for the next front-end development. Web.xml file will look almost empty in contracts to XML configuration.
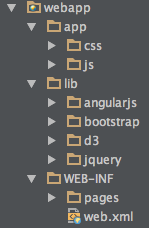
...
Miko Scala Spring 4 - Example without Web.xml 
...
  The application package structure is very similar to the previous ones. I want to keep consistency and get possibility to have the reference to the Java implementation (Img.2.) in case of possible comparison.
Img.2.:: Example Spring4 Scala application packages structure

Now I simply turn the Java into the Scala in several steps

1. Scala WebConfig will look like following

..
@Configuration
@ComponentScan(basePackages = Array("miko.scala.helloexample"))
@EnableWebMvc
class WebConfig extends WebMvcConfigurerAdapter{

  override def addResourceHandlers(registry: ResourceHandlerRegistry) = {
    registry.addResourceHandler("/app/**").addResourceLocations("/app/").setCachePeriod(31550522)
  }

  override def configureDefaultServletHandling(configurer: DefaultServletHandlerConfigurer) = {
    configurer.enable()
  }

  @Bean
  def viewResolver = {
    val viewResolver = new InternalResourceViewResolver
    viewResolver.setViewClass(classOf[JstlView])
    viewResolver.setPrefix("/WEB-INF/pages/")
    viewResolver.setSuffix(".jsp")
    viewResolver
  }
}
2. Scala WebInitializer which help us setup ServletContext at the starup 
class WebInitializer extends WebApplicationInitializer{

  override def onStartup(servletContext: ServletContext) = {
    val ctx = new AnnotationConfigWebApplicationContext
    ctx.register(classOf[WebConfig])

    ctx.setConfigLocation("META-INF/spring/app-spring-scala.xml")

    val servlet: Dynamic = servletContext.addServlet("dispatcher", new DispatcherServlet(ctx))
    servlet.addMapping("/")
    servlet.setLoadOnStartup(1)
  }
}
3. Scala HelloExampleController class annotated by @Contoller annotation. The Annotation takes care about HttpServletRequest and Responses. This example controller also shows how Services are @Autowired when Scala language is used. 
@Controller
@RequestMapping(Array("/"))
class HelloExampleController @Autowired() (exampleService: ExampleService, exampleImportService: ExampleImportService){

  @RequestMapping(method =  Array(RequestMethod.GET))
  def hello( model: Model) = {
    model.addAttribute("message", "Here is Scala with ServiceName = " + exampleService.serviceName)
    model.addAttribute("importMessage", "Here is Scala with ServiceImportName = " + exampleImportService.name)
    "hello"
  }
}
4. Scala Example...Services used by HelloExampleController are done over quite powerful Traits implementation. Traits are very similar to Java Interfaces but they allows partial implementation which makes them much more powerful (out of blogpost scope ;).  
trait ExampleImportService {
  def name: String
}
-----
class ExampleImportServiceImpl extends ExampleImportService{
  override def name: String = "Imported service over XML"
}

after all those steps we've ready Scala Spring 4 application to test. We've also source code to compare with previous Java8 implementation. Scala does the great work because thinking in functions and callbacks intentions makes whole development more strait forward. 
Enjoy sample application ! (GitHub miko-spring-scala)

Spring 4 MVC without Web.XML configuration - static resources handling

This short post is the update to the previous ones: 
    Previously was only defined the way how to link symbolic links and components location  to scan which are normally defined by specific ServletContext *.xml file as in following example :
...


...
and we've transformed such *.xml file into the Java code in github project miko-s4netty:
@Configuration
@ComponentScan("com.miko.s4netty")
@EnableWebMvc
public class WebConfig {
    @Bean
    public UrlBasedViewResolver setupViewResolver() {
        UrlBasedViewResolver resolver = new UrlBasedViewResolver();
        resolver.setPrefix("/WEB-INF/pages/");
        resolver.setSuffix(".jsp");
        resolver.setViewClass(JstlView.class);
        return resolver;
    }
}

Let's give *.jsp pages access to the static resources and consider following project structure (Img.1.)
Img.1. - part of project structure with static resources
From the Img.1. comes the necessity to link the two folders ("/app", "/lib") which will by available for the front-end development after the application deployment. In such case we need to extend the implementation of the WebConfig class and configure callback methods to correctly customise Java-based configuration of the project. 

1. WebConfig extends WebMvcConfiguredAdapter which give us possibility to directly override necessary methods from WebMvcConfigurerWebMvcConfigurer is normally imported by adding @EnableWebMvc annotation to @Configuration application class. The result it then delegated to WebMvcConfigurationSupport which provides Java-based config possibility. 
@Configuration
@ComponentScan("com.miko.s4netty")
@EnableWebMvc
public class WebConfig extends WebMvcConfigurerAdapter {
2. XML tag annotation for handling servlet requests <mvc:default-servlet-handler /> needs to be reflected in the WebConfig class by overriding  configureDefaultServletHandling method


...
@Override
public void configureDefaultServletHandling(DefaultServletHandlerConfigurer configurer) {
   configurer.enable();
}
...
3. Also resources request handling needs to be reflected by overriding appropriate method in the class WebConfig. This is normally done by XML tags <mvc:resources/> 


...
@Override
public void addResourceHandlers(ResourceHandlerRegistry registry) {
   registry.addResourceHandler("/app/**").addResourceLocations("/app/").setCachePeriod(31550522);
   registry.addResourceHandler("/lib/**").addResourceLocations("/lib/").setCachePeriod(31550522);
}
...
The last WebConfig class modification opens the possibility to continue building front-end application with appropriate resources. 
The final result of WebConfig class according to the front-end project structure (Img.1.) can looks like following example.
@Configuration
@ComponentScan("com.miko.s4netty")
@EnableWebMvc
public class WebConfig extends WebMvcConfigurerAdapter {
    @Override
    public void addResourceHandlers(ResourceHandlerRegistry registry) {
        registry.addResourceHandler("/app/**").addResourceLocations("/app/").setCachePeriod(31550522);
        registry.addResourceHandler("/lib/**").addResourceLocations("/lib/").setCachePeriod(31550522);
    }

    @Override
    public void configureDefaultServletHandling(DefaultServletHandlerConfigurer configurer) {
        configurer.enable();
    }

    @Bean
    public UrlBasedViewResolver setupViewResolver() {
        UrlBasedViewResolver resolver = new UrlBasedViewResolver();
        resolver.setPrefix("/WEB-INF/pages/");
        resolver.setSuffix(".jsp");
        resolver.setViewClass(JstlView.class);
        return resolver;
    }
}
Enjoy building rich front-end application!

Friday, June 27, 2014

Spring4Netty without Web.XML configuration on Java 8 (JBoss WildFly and Tomcat 8) - part.5:: Application Servers and logging

  
img.1.: official log


  This part about selected application start normally, just by downloading both of them and setting them up in your favorite IDE (img.2.) which is in my case IntelliJ IDEA (img.1.)


img.2.: Application Serves bond with IDE
   So here we go, app servers inside (like the intel processor). What it good to point out already at the beginning is the servlet-api versions support. 

Don't try to run this example project (GiTHub repository) on Tomcat 6.x. Why ? It's because Tomcat 6.x supports servlet-api ver. 2.5, and as you can find in the parent pom.xml file, the version 3.x of servlet-api is required. It's because of features we have touched earlier  (part.4..

   Almost every project uses some logging framework, in project case we use Simple Logging  Facade (SLF4j) together with well known Log4j. I don't want to write a lot about application logging design it's the another story (this project is just hot setup of usage). 
   What I want to touch here is the topic "How to enable logging under JBoss WildFly per deployment for SLF4j" 
   It 's because by the default installation of WildFly it not allowed. You see actually any Logger output in your SystemOut or log file.  

Let's edit in following way the ../standalone.xml file that you can find in the WildFly directory
   ...


            <!-- IMPORTANT LINE --> 


                ...


        ...
        
   ...
   
   ...
The logging is not fully setup but important details are there so you can enjoy my project. 
s4netty project GiTHub repository


ps: Also I've not merged JUnit, Mockito  tests in case I didn't want to touch this topic in this blogpost. 

Spring4Netty without Web.XML configuration on Java 8 (JBoss WildFly and Tomcat 8) - part.4:: Base - Spring MVC without Web.xml usage 2

  
img.1.: s4netty-web deployment result

  The base web module s4netty-web is almost similar to  the previous worker module (s4netty-worker) from the perspective of the Spring MVC configuration. 

  The main difference is the Servlet Context setup. In the usage 1 (s4netty-worker) everything was defined by appropriate annotations. In the usage 2 (s4netty-web) the Servlet Context is defined in traditional XML way from perspective of servlet definition. 
   ...


   ...
  The WebApplicationContext is instantiated by XmlWebApplicationContext which (img.2.) extends AbstractRefreshableWebApplicationContext. Here we go deeper to all WebApplicationContext implementations which are supposed to instantiate themselves  according to the provided configuration over the interface. 
img.2.: s4netty-web module structure 
  The purpose of  XmlWebApplicationContext  class is to load WebApplicationContext from the XML configuration files.  
public class WebInitializer implements WebApplicationInitializer {
    ...
    @Override
    public void onStartup(ServletContext servletContext) throws ServletException {
        ...
        XmlWebApplicationContext ctx = new XmlWebApplicationContext();
        ctx.setConfigLocation("WEB-INF/spring/dispatcher-servlet.xml");
        ctx.setServletContext(servletContext);
        ...

  What was also earlier only briefly touched (part1:: img.0.) is the ability of s4netty-web module to communicate with s4netty-worker  module utilising JSON serialisation/deserialisation over the service and pre-defined port P.

  The s4netty-web module uses instantiation of the RestTemplate which simplifies communication with HTTP server, its synchronous and it enforces RESTful principles, what is obvious from it name RestTemplate ;), but honestly it's pretty handy to use. 
@Controller
@RequestMapping("/")
public class MainController {
    ...
    RestTemplate restTemplate = new RestTemplate();

    @RequestMapping(method = RequestMethod.GET)
    public String printWelcome(ModelMap model) {
    ... 
  Let's ask s4netty-worker module for the car list using newly instantiated RestTemplate
    ...
   private List getSimpleCarList(){
        List result = new ArrayList<>();
        try{
            result = restTemplate.getForObject(S4_NETTY_WORKER_LINK, List.class);
            logger.debug("getSimpleCarList result= " + result);
        }catch (HttpClientErrorException e){
            logger.error("getSimpleCarList jsonCarList e= " + e);
        }
        return result;
   }
   ...

  Now we have ready two deployable war files and we can take a look at the result. But before we do so it's fair to mention why such configuration works.  The reason is that we do use for
 registering servlets in both cases  
   ...
   import javax.servlet.ServletRegistration.Dynamic
   ...

interface which uses one of addServlet()  methods into ServletContext. The interface is the part of javax.servlet-api imported previously by Maven into the project. 
  ...
  
        javax.servlet
        javax.servlet-api
        3.0.1
        provided
  
  ...
After this final hit we do know all and we can start with deployment on application servers (JBoss WildFly & Tomcat 8 were selected).
Let's make it in the Next part (Click Next

s4netty project GiTHub repository


Thursday, June 26, 2014

Spring4Netty without Web.XML configuration on Java 8 (JBoss WildFly and Tomcat 8) - part.3:: Worker - Spring MVC without Web.xml usage 1


  Now we are entering the last stage in case of s4netty-worker.  Although we have already enabled Netty usage under spring ecosystem, we still want to provide some simple web (Spring MVC) for this module to see the output from the Netty JSON service.  


s4netty-worker - spring mvc output
img.1.: Spring MVC output from s4netty-worker

  I won't go into the details how to build up the basic Spring MVC project because it's easy to find out by our friend google. What is interesting is how to not use web.xml (Deployment Descriptor Element which determinates the urls mapping to appropriate servlets ) definition alias get some freedom for Java web applications. In case of s4netty-worker we do almost everything over annotations, only beans will be defined in separate app-worker-config.xml file (viz. img.2).  


img.2.: s4netty-worker module structure 

  Before we initiate web application itself by WorkerWebInitializer, that implements WebApplicationInitializerwe need to do some configuration here. (ps. WebApplicationInitializer allows us to configure servlets, filters and etc. by @Override onStatrup method)
public class WorkerWebInitializer implements WebApplicationInitializer {
   ...
   @Override
   public void onStartup(ServletContext servletContext) throws ServletException {
       AnnotationConfigWebApplicationContext ctx = new AnnotationConfigWebApplicationContext();
       ctx.register(WorkerWebConfig.class);
       ctx.setConfigLocation("spring/app-worker-config.xml");
   ...
without such configuration our WorkerWebInitializer is useless because after WebApplicationContext instantiation Spring looks for Spring configuration files annotated by @Configuration annotation. For this purpose we create WorkerWebConfig class. 


@Configuration
@ComponentScan("com.miko.s4netty")
@EnableWebMvc
public class WorkerWebConfig {
   ...
   @Bean
   public UrlBasedViewResolver setupViewResolver() {
   ...

in WorkerWebConfig class we tell to the Spring where it should look for the rest of components (example: classes annotated by @Controller). By using @EnableWebMvc we import  the DelegatingWebMvcConfiguration which delegates us to all beans reliable for WebMvcConfigurer and our customisation.  At the end the method setupViewResolver allows us to briefly solve symbolic link name to the URL. Pretty cool, isn't it ?

  The one of the impact is that we can store our favorite ;) *.jsp pages in the appropriate directory (img.2.)

  Now we have ready s4netty-worker web output with appropriate Beans initialisation, which is done by ServletContext configuration definition located in the file spring/app-worker-config.xml


   And finally our result looks according to the img.1. mentioned at the beginning of this part. 
The big moment is here because we are moving to the stage 2 (s4netty-web).
The next part (Click Next

s4netty project GiTHub repository